MoGraph is a huge advancement in the field of motion graphics. It is a toolset in CINEMA 4D which helps you to create spectacular visual effects, logos, and text. MoGraph is a collection of objects, shaders, and scripts that can be combined to create models and animation. In this tutorial, you will learn about the tools and effectors available in MoGraph toolset of CINEMA 4D.
Step 1: Create a helix in the viewport using the Helix tool. Next, in the Attribute Manager, set the parameters as follows:
Start Radius: 0 Start Angle: –44 Height: 770
Step 2: Using the Viewport Navigation Tools, place the helix in the
Perspective viewport, as shown in Figure 1.
 |
| Figure 1 |
Size . X: 15 Size . Y: 15 Size . Z: 200
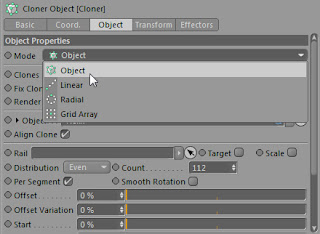
Step 4: Create a cloner using the Cloner tool. In the Attribute Manager, select Object from the Mode drop-down list, as shown in Figure 2.
 |
| Figure 2 |
Step 5: Make sure that Cloner is
selected in the Object Manager. In the Attribute Manager, choose the arrow
button next to the Object text box and select
Helix in the Object Manager, as shown in Figure 3. The helix
object is added to Object text box.
 |
| Figure 3
Step 6: Make sure that Cloner is
selected in the Object Manager. In the Attribute Manager, enter
112 in the Count spinner and select
Even from the Distribution drop-down list.
|
Step 7: In the Object Manager, select Cube and then drag it to Cloner; the Cube is connected to Cloner. Also, clones of Cube are created in the Perspective viewport, as shown in Figure 4.
 |
| Figure 4 |
Step 11: Make sure that Cloner.1 is selected in the Object Manager. In the Attribute Manager, choose the Object button and select Radial from the Mode drop-down list. Next, enter 3 in the Count spinner and 50 in the Radius spinner.
Step 12: In the Object Manager, select Cloner and then drag it to Cloner.1; the Cloner. 1 is connected to Cloner. Also, clones of Cloner.1 are created in the Perspective viewport, as shown in Figure 6.
 |
| Figure 6 |
Step 14: Select PolyFX in the Object Manager and drag it to Cloner. The PolyFX is connected to Cloner in the Object Manager, as shown in Figure 7.
 |
| Figure 7 |
Step 15: Select PolyFX in the Object
Manager and choose the Effectors button in the Attribute
Manager. Next, drag Random from the Object Manager to the
Effectors area. The Cloner is fragmented in the Perspective
viewport, as shown in Figure 8.
 |
| Figure 8 |
 |
| Figure 9 |
 |
| Figure 10 |
Step 19: Create background from using the Background tool. Next, in the Attribute Manager, select On from the Use Color drop-down list.
Step 20: Choose Render Settings tool from the Command
Palette; the Render Settings window will be displayed. In the
Render Settings window, choose Effects button; a flyout will be
displayed. Choose Ambient Occlusion from it.
Step 21: Choose the Render to Picture Viewer tool from the Command Palette. The model is rendered in the Picture Viewer window, as shown in Figure 11.
 |
| Figure 11 |

No comments:
Post a Comment